Lab Three: Promoting a Four-Day U. S. National Park Itinerary Via Google Earth Pro
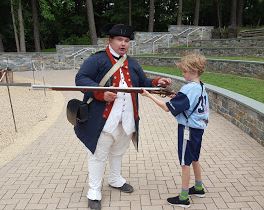
A young visitor interacts with park staff at Yorktown Battlefield,
part of Colonial National Historical Park, Yorktown, Virginia
Lab Three Goals
- Gain additional experience navigating and using tools in Google Earth Pro
- Utilize web map service (WMS) products (e.g., base maps, roads, 3D buildings, Street View, and other geographical content) found in GE
- Explore and highlight a U.S. National Park from a GE perspective
- Create folders in GE
- Create and share a set of virtual field trip Placemarks (.kmz files) that outline / promote an itinerary
- Create and share a GE tour Placemark
- Sharpen your web publishing skills
The Scenario
Armed with a BA in geography from UCCS, you have been hired by a Dutch tourism company named Ontdekken (explore / uncover / discover) to create a four-day itinerary for a group of visitors seeking to explore a U.S. National Park. This four-day tour consists of:
- Day One: Air travel Schiphol Airport (Holland) to U.S. airport; vehicle travel U.S. airport to a U.S. National Park campground / lodge / hotel
- Day Two: Activities within U.S. National Park
- Day Three: Activities within U.S. National Park
- Day Four: Vehicle travel U.S. National Park campground / lodge / hotel to U.S. airport; air travel U.S. airport to Schiphol Airport (Holland)
Two groups with different interests have registered with Ontdekken: Pick One:
- Outdoor Adventure-Themed Tour: Those seeking outdoor adventure. These are active, outdoor-loving, adventure seekers that are interested in physical activity. The group have expressed interest in road biking, hiking, climbing, fishing, canoeing, rafting, back-country skiing, snowshoeing, horseback riding, and similar outdoor-recreational activities.
- US History and Culture-Themed Tour: Those with interests in US history and culture. These individuals desire to learn about American history / culture as presented / interpreted in a US National Park.
To Do Well
- Be detailed and realistic with travel logistics.
- Carefully follow the 'Steps' section below.
- Occasionally, you are asked to write brief paragraphs. Please take your time with these and pass them through a spell checker.
- Keep in mind that you are providing paying customers with a precise itinerary -- so spend some time in GE to create attractive, representative perspectives (GE Placemarks) of their destinations.
US National Parks
 The United States boasts 59 protected areas known as National Parks that are operated by the National Park Service, an agency within the Department of the Interior. Twenty-seven states host National Parks, as do the territories of American Samoa and the United States Virgin Islands. California has the most (nine), followed by Alaska (eight), Utah (five), and Colorado (four). Yellowstone National Park sits in parts of three states: Wyoming, Montana, and Idaho. More here.
Due: Sun., Feb. 24, 5:00 PM
Tools
- Google Earth Pro
- Web Expression 4
- FileZilla
- Web browser
What I Grade
- On your Lab Three web page, I will carefully read your descriptions and captions, and I will click on each Placemark (see below). If linked correctly, these Placemarks will open up in GE. Pay particular attention to the final 'tour' Placemark.
Step One: On Your Z Drive, Create A Folder Named 'kmzs'
Create a folder named 'kmzs' inside of your lab_3 folder here: ges2050/web/lab_3/ This is where you will store the individual GE Placemark files (kmz files) that you create in this lab.
Step Two: In GE, Create Folders in the 'My Places' Folder
- Open up Google Earth Pro
- On the left side of the GE window in the table of contents, right-click on 'My Places,' select 'Add' 'Folder.' Name the new folder 'kmzs'
- INSIDE of the 'kmzs' folder, create a folder named 'itinerary' (this is where you will save seven itinerary kmzs)
- INSIDE of the 'kmzs' folder, create a folder named 'tour' (this is where you will save the one tour kmz)
- NOTE: Placemarks are not saved automatically when you close GE or log out of a UCCS PC. Therefore, it is imperative that from time to time you save (save as .kmz) all of your Placemarks from GE to your Z drive.
Step Three: Create Seven (7) Attractive Placemarks that Promote the Itinerary
- Important: On your Lab Three web page, use the headings listed in blue below, and include the information as described in each section.
- Important: The Placemarks you will include on your web page are shown in red, and are already named for you.
- Important: Save all 7 Placemarks in Step Three into your 'itinerary' folder in Google Earth.
- Important: These need to be individual Placemarks (.kmzs) because you will create separate links to each .kmz from your Lab Three web page.
- Open EW4. Open your Lab Three (lab_3.html) web page.
- GROUP NAME: Give your travel group a fun, descriptive name (keep it clean). As examples, 'Team Heineken' or 'Civil War Junkies.’
- NATIONAL PARK: Name the US National Park and hyperlink the National Park's name (e.g., Shenandoah National Park) to that park's official (nps.gov) website.
- WHY THIS PARK WAS SELECTED: Based on your group’s interests, explain in a brief paragraph why you selected this particular park.
- TRAVEL DATES: Which four-day period (in 2019 or 2020) will the tour run?
- DAY ONE ITINERARY:
- All guests fly from Amsterdam's Schiphol Airport to ____________ (name the U.S. airport where you will pick up your group).
- Provide vehicle travel time and distance from U.S. airport to hotel / campground
- Create in GE, and hyperlink in EW4, three GE Placemarks:
- Amsterdam's Schiphol Airport (this Placemark, named 'SchipholAirport,' should characterize / capture the essence of the Schiphol Airport Amsterdam; include a caption below the linked Placemark)
- US Airport (this Placemark, named 'USAirport,' should characterize / capture the essence of the airport; include a caption below the linked Placemark)
- Lodging
(this Placemark, named 'Lodging,' should characterize / capture the essence of the place of lodging; include a caption below the linked Placemark)
NOTE: The group will stay at this place of lodging for the duration of their three-night stay
- DAY TWO ITINERARY:
- Provide vehicle travel time and distance from place of lodging to National Park destination 1 of 2.
- Where specifically in the park will this activity occur (describe the location of Destination 1 of 2)
- Describe the specific activity (or activities) planned for day two
- Create and hyperlink three GE Placemarks:
- Day Two activity location (these Placemarks, named 'DayTwoPlacemarkDestination1' and 'DayTwoPlacemarkDestination2' should both characterize / capture the essence of the destination for Day Two's activities; include a caption below each Placemark)
- Evening two lodging (this Placemark, named 'Lodging,' you have already created).
- DAY THREE ITINERARY:
- Provide vehicle travel time and distance from place of lodging to National Park destination 2 of 2.
- Where specifically in the park will this activity occur (describe the location of Destination 2 of 2)
- Describe the specific activity (or activities) planned for day three
- Create and hyperlink three GE Placemarks:
- Day Three activity location (these Placemarks, named 'DayThreePlacemarkDestination1' and 'DayThreePlacemarkDestination2' should both characterize / capture the essence of the destination for Day Three's activities; include a caption below each Placemark)
- Evening three lodging (this Placemark, named 'Lodging,' you've already created).
- DAY FOUR ITINERARY:
- Provide vehicle travel time and distance from place of lodging back to U.S. airport.
- Create and hyperlink two GE Placemarks:
- US Airport (this Placemark, named 'USAirport,' you have already created)
- Amsterdam's Schiphol Airport (this Placemark, named 'SchipholAirport,' you've already created)
- SAVE YOUR WORK:
- In GE, right-click on each individual Placemark file that you created in your 'itinerary' folder and 'Save Place As' into your 'kmzs' folder on your Z drive here: ges2050/web/lab_3/kmzs
Step Four: Create a GE Tour from Your Seven (7) Placemarks
Tours, which are created in GE, create a timeline (audio is optional) from individual Placemarks. Tours 'fly' you from Placemark to Placemark. Your tour will be created from your seven Placemarks (so 7 different 'stops').
- Click on the 'Record a Tour' icon (located at top of scene window)
- A little 'record bar' opens up.
- Click the red record button when you are ready
- Click through all 7 of your Placemarks (in order)
- Click the red record button again to stop your tour
- Click the save icon on the right side of the record tour bar
- Save your tour as 'Tour' into your 'tour' folder in GE.
- SAVE YOUR WORK:
- In GE, right-click on your 'Tour' Placemark file (stored inside of your 'tour' folder) and 'Save Place As' into your 'kmzs' folder on your Z drive here: ges2050/web/lab_3/kmzs
- On your Lab Three webpage, in a section (the last section)! named TOUR, add 'Tour' (and, as you have done earlier, link the tour Placemark to this text, and include a caption below the linked Placemark).
Step Five: Publish (FileZilla) your completed Lab Three and test all KMZs in a web browser on a computer with Google Earth or Google Earth Pro