How to Create a GES2050 Class Website:
A Step-by-Step Guide
|
When complete, your site will function like the site linked from the image above. |
Goals:
- To create a working website through which all lab work in GES2050 is graded
- To provide a basic skill set for creating a web-based portfolio where you demonstrate an ability to communicate and present information through the internet
- To experience first-hand the importance of file and folder naming conventions and directory (folder) structures
- To learn the basics of HTML editing software and file transfer protocol (FTP) software
Due:
- By the end of class, Tues., Jan. 22.
Grading:
- 5% of course grade
- Note: Completion of this assignment is required in order to pass GES2050
Software needed:
- Windows Explorer file management system: called 'This PC' and 'File Explorer' in Windows 10
- PuTTY SSH Client software
- FileZilla: file transfer protocol (FTP)
- Microsoft (MS) Expression Web 4 (EW4): HTML editing software
- A web browser: MS Edge, Google Chrome, Mozzila Firefox
- MS Snipping Tool: Image 'grabbing' or 'snipping' software
Let's make a website!
Step 1
Have PuTTy automatically create your personal UCCS web folder
- Open PuTTY
- The goal here is to create your own personal web space on a web server that you (and I) can access on any UCCS computer. A software called 'PuTTy SSH Client' will do this for you. The first time you log in to PuTTy, your UCCS web folder is automatically created for you. Note that your web space will be named according to your UCCS user name (mine is 'bvogt')
- Your new web site will be hosted on a UCCS server named 'coursework' (https://coursework.uccs.edu/yourusername).
- To set up your UCCS web folder, you now must follow the steps as outlined on this Spring 2019 UCCS Helpdesk Knowledge Base web page. Also, here is a UCCS IT page that provides context about the 'coursework' folder.
Step 2
Create a series of folders in your student workspace (the z: drive).
- In 'File Explorer' / 'This PC', navigate to your z drive (Z:\)
- At the root of your Z drive, create a new folder; name it ges2050 IMPORTANT: always, always, always, use all lower case.
- Inside of the ges2050 directory, create three new directories: web, data, and working (NOTE: all of the web pages you create this semester will be stored in the web directory)
- Inside of your ges2050/web/ directory, create 9 additional directories. Name them as follows: images, lab_1, lab_2, lab_3, lab_4, lab_5, lab_6, lab_7, lab_8. IMPORTANT: use an underscore (_) NOT a space when you create these folders.
- Inside of each lab directory (there are 8), create a directory named images
- When you are finished, your ges2050 directory structure (on your Z drive) should look like Figure 1 below
|
Figure 1 The ges2050 directory structure for your Z drive. Note that an identical structure (only without 'data' or 'working') will eventually be placed INSIDE of your public_html directory that resides on the 'coursework' web server, that you access through FileZilla. |
Step 3
Create a “Hello World!” Web Page to test your web publishing skills:
- Open Microsoft Expression Web 4 software (called 'EW4' from now on)
- A web page named Untitled_1.html is automatically created for you.
- Type the words Hello World! Center the text (select text, click on the 'Center' icon).
- Save the file as (File > Save As) into your Z drive's ges2050/web directory. WAIT! Specifically, save the .html file as index.html The default is 'Untitled-1.html' and you must change that. So make sure you type out index.html. In your Z drive, the file path to your new "Hello World!" web page should be exactly: ges2050/web/index.html
- Close EW4 - Later, you will move this new web page from your Z drive to the internet (to the 'coursework' server).
Step 4
Transfer your ges2050 directory, and all of its contents, from your PC's z: drive INTO your web directory named public_html
- Open FileZilla software. For 'Host' type coursework, for 'Username' type your UCCS username, for 'Password' type your UCCS password, for 'Port' type 22
- Click the "Quickconnect" button.
- On the left side of the screen, you will see your 'Local site.' This is your computer and all of the drives you can access.
- On the right side of the screen, you will see the 'Remote site.' This is your web space (the server-side). You should see a directory called public_html NEVER DELETE OR RENAME THIS DIRECTORY! You might see directories called .cache or .bin or others. NEVER DELETE OR RENAME THESE!
- All semester, you will ONLY transfer files into the public_html folder.
- Open (double-click) the public_html folder.
- Next, in FileZilla, drag and drop (from left to right across the screen) the ges2050 directory into the web server directory public_html
- Go to: https://coursework.uccs.edu/youruccsusername/ges2050/web/ to see if your index.html file (the 'Hello World' page) displays properly in a web browser. NOTE that you do not need to type the 'index.html' part of the path in a web browser (pages named index.html are read first (over other names) by web browsers).
- NOT WORKING? PLEASE make sure the paths are exactly as described above.
- Keep in mind that Brandon will grade ALL OF YOUR LABS by clicking on your website (under 'Student Websites") here: https://academics.uccs.edu/~bvogt/courses/ges2050/index.html
- BEFORE MOVING TO STEP FIVE: SHOW BRANDON THE GES2050 FILES ON YOUR Z: DRIVE AND THE FILES ON YOUR WEB SPACE
Step 5
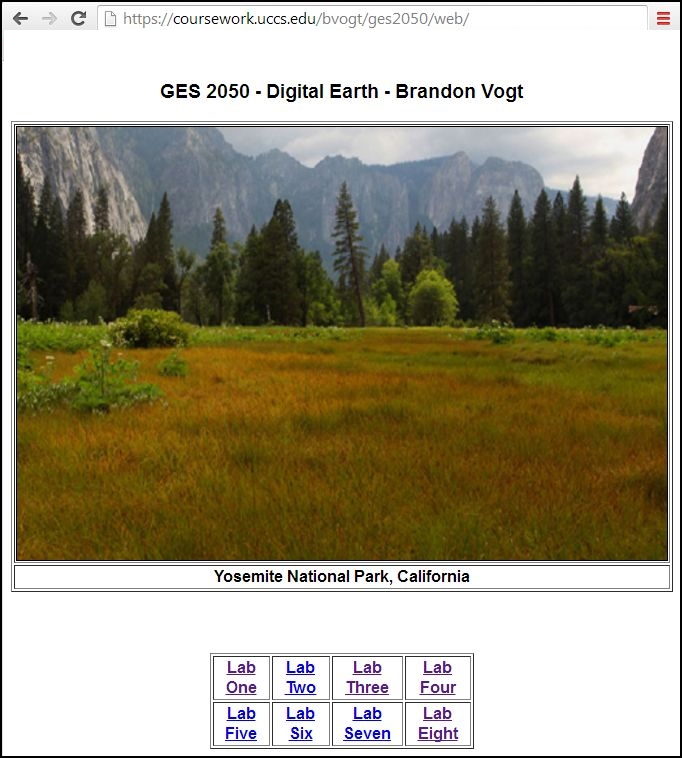
A: Add two tables and your favorite image to your index.html webpage
- Open EW4
- Open up the index.html web page (from z drive) from EW4. Replace the text “Hello World!” with the text “Digital Earth - GES2050 - Your Name”
- On the index.html page, create a 2 row, 4 column table (table > insert table > rows: 2, columns: 4), specify width: 75%. Center the table (select the table, click the 'center' icon). In the 8 cells, type ‘Lab 1’, ‘Lab 2’, ‘Lab 3’, ‘Lab 4,’ ‘Lab 5,’ ‘Lab 6,’ ‘Lab 7,’ and 'Lab 8'. Center the text in the cells. NOTE - Soon, you will link the text in each cell (e.g., 'Lab One') to the various lab web pages (e.g., lab_1.html) you will create.
- Next you will add an image to your page. This image will be placed inside of a table:
- Create a 2 row, 1 column table below the 2 x 4 table.
- Find a favorite image of you? Your dog? Your favorite place? (use .jpg format) and save this image (save as) to your ges2050/web/images directory on your z drive (for example, here I used an image I took in Yosemite National Park).
- THIS IMAGE SHOULD BE NO LARGER THAN ~750 pixels vertically or horizontally. The 'SNIPPING TOOL' is a great way to 'snip' from whatever is on your PC's screen. Search for 'SNIP' in Windows 10 to use the tool.
- In EW4, place your cursor in the top cell of your 2 x 1 table, add the image (Insert > Picture > From File). Navigate to the images folder where your image is stored (public_html/ges2050/web/images). Select the image.
- Place an image caption in the bottom cell (the cell below the image)
- Save your updated web page (File > Save As) to your z: drive (in the appropriate place). Use FileZilla to transfer the updated page from your PC (z: drive) to the public_html/web directory. Don’t forget to transfer (also using Filezilla) the image, which will go inside your images folder here: public_html/ges2050/web/images
- Open a web browser, test your work.
B: Create 8 lab web pages and link the new pages to the appropriate text (Lab One, Lab Two...) in the 2x4 table on your main index.html page
- In EW4, create a new web page. This page will be your 'Lab 1' web page. Type the text "Lab One" on the top of the page. When you are done, save as lab_1.html, and save it to your Z drive inside of your lab_1 folder here: ges2050/web/lab_1/
- To make all additional lab web pages (lab_2.html, lab_3.html, etc.), just 'save as' the lab_1.html page to the other lab directories (lab_2, lab_3, etc.) and rename lab_2.html, lab_3.html, etc. If this 'save as' shortcut doesn't make sense, ask Brandon for help.
- Make sure you add the text "Lab Two" "Lab Three" etc. to the top of each new lab web page.
- LINK each lab web page to the appropriate lab (1 through 8) in the table on your index.html page.
- To link: Select the text you want to link. Right-click and select hyperlink. Navigate to the page you want linked.
- Save.
- Use FileZilla to transfer the new pages (including your updated index.html page) from your z:drive to the web server.
- Go online to test your work (the most important step is testing your work)!
- When finished, site should function like this.
- Make absolutely sure all eight lab page links work: Test your page from the main GES2050 course page and then click on EACH lab page to make sure it's all working properly. You are now a web designer.
Your UCCS website on 'coursework' server CANNOT be viewed from off campus by your or by anyone unless VPNed to campus. Your website IS visible by anyone on campus (library, computer labs, or using UCCS wireless).